
This article covers a basic Selenium project, including integrating TestNG and implementing a Page Object pattern. It also explores the features and benefits of Selenide, demonstrating its usage for elements, assertions, and waits. You will know how to incorporate the Selenoid framework to execute tests within or outside Docker containers.
Reading time: 36 min.
QA teams face an ongoing challenge to meet the increasing demands of software testing in today’s ever-evolving technological landscape. The need for efficient and reliable test automation solutions has become paramount. Enter Selenide Test Automation, a groundbreaking framework transforming QA professionals’ approach to testing.
At its core, Selenide Test Automation represents a significant shift in the software testing world. It offers an intuitive and streamlined approach to automate web application testing, enabling QA teams to achieve exceptional efficiency, accuracy, and speed in their testing processes. By harnessing the power of Selenide, QA professionals can elevate their testing efforts, ensuring the delivery of high-quality software products in record time.
Selenide Test Automation is a cutting-edge framework built on top of Selenium, a widely adopted automation tool for web browsers. It takes the Selenium experience to the next level by providing a simplified API, making it accessible for professional and personal usage. This means QA professionals no longer need to struggle with complex and lengthy code. Instead, they can write clean, concise, and highly readable test scripts that are easier to maintain and understand.
Equipped with a comprehensive set of features, Selenide Test Automation enhances the testing endeavors of QA professionals. Built-in assertions and smart waits eliminate the challenges of manual waiting and troubleshooting flaky tests. Selenide effortlessly handles dynamic elements, AJAX calls, and JavaScript-heavy applications, ensuring stable and robust test execution.
Furthermore, Selenide Test Automation seamlessly integrates with popular testing frameworks like TestNG and JUnit, enabling effective test management and reporting. The framework supports parallel test execution, empowering QA teams to leverage distributed environments or cloud-based platforms for faster and more efficient testing.
To maximize the potential of Selenide, we explore the integration of Selenoid in Docker containers. This powerful combination grants QA teams unmatched flexibility, scalability, and portability in their test environments. Testers can easily manage and orchestrate their testing infrastructure by leveraging Docker containers, ensuring reliable test execution within controlled and isolated environments.
In this article, we delve deep into the world of Selenide Test Automation, showcasing its transformative capabilities and the significant benefits it offers QA teams. We provide a comprehensive understanding of Selenide’s core concepts, simplified API, and unique features that position it as a game-changer in test automation. Additionally, we demonstrate the seamless integration of Selenoid in Docker containers, enabling the downloading binary and unlocking a new level of efficiency and scalability for your testing infrastructure.
Join us on this journey as we unveil the power and potential of Selenide Test Automation. Explore the remarkable benefits of this revolutionary framework and witness a significant improvement in test efficiency, accuracy, and overall software quality. With its intuitive and streamlined approach, Selenide Test Automation empowers QA teams to achieve outstanding results, confidently delivering high-quality software products. Embrace this robust implementation and revolutionize your QA efforts like never before.
.
.
We are considering a project build on the Maven builder, so we can find the project structure description in the pom.xml file. To order use Selenium+TestNG, we should add appropriate dependencies to pom.xml file. You can observe them between the dependencies tags below:
                           <?xml version="1.0" encoding="UTF-8"?>
                           <project xmlns="http://maven.apache.org/POM/4.0.0"
                                       xmlns:xsi="http://www.w3.org/2001/XMLSchema-instance"
                                       xsi:schemaLocation="http://maven.apache.org/POM/4.0.0 http://maven.apache.org/xsd/maven-4.0.0.xsd">
                              <modelVersion>4.0.0</modelVersion>

                              <groupId>test</groupId>
                              <artifactId>test</artifactId>
                              <version>1.0-SNAPSHOT</version>
                              <dependencies>
                                       <dependency>
                                                <groupId>org.seleniumhq.selenium</groupId>
                                                <artifactId>selenium-java</artifactId>
                                                <version>3.141.59</version>
                                      </dependency>
                                      <dependency>
                                                <groupId>org.testng</groupId>
                                                <artifactId>testng</artifactId>
                                                <version>6.14.3</version>
                                                <scope>test</scope>
                                     </dependency>
                            </dependencies>
                          </project>
Here is the example of the Page Object:
import...

public class SignUpPage {
   private WebDriver driver;

   public SignUpPage(WebDriver driver) { this.driver = driver; }

   private By emailField = cssSelector("#register-email");
   private By confirmEmailField = cssSelector("#register-confirm-email");
   private By passwordField = cssSelector("#register-password");
   private By displayNameField = cssSelector("#register-displayname");
   private By monthDropDown = cssSelector("#register-dob-month");
   private By dayField = cssSelector("#register-dob-day");
   private By yearField = cssSelector("#register-dob-year");
   private By shareCheckbox = cssSelector("#register-thirdparty");
   private By registerButton = cssSelector("#register-button-email-submit");

   public SignUpPage typeEmail(String email) {

	driver.findElement(emailField).sendKeys(email);
      return this;
  }

  public SignUpPage typeConfirmEmailField(String email) {...}

  public SignUpPage typePassword(String password) {...}

  public SignUpPage typeName(String name) {...}

  public SignUpPage setMonth(String month) {...}

  public SignUpPage typeDay(String day) {...}

  public SignUpPage typeYear(String year) {...}
As we can see, there is a description of variables with locators for the elements of the registration page at the top of the java file. There are methods directly for interacting with elements of our page below the variable section.
Let’s open the tests themselves:
private WebDriver driver;
private SignUpPage page;
@BeforeMethod
public void setUp() {
System.setProperty("webdriver.gecko.driver",
"C:\\Users\\Nikita\\IdeaProjects\\autotests_examples\\drivers\\geckodriver.exe");
driver = new FirefoxDriver();
driver.manage().timeouts().impicitlyWait(10, TimeUnit.SECONDS);
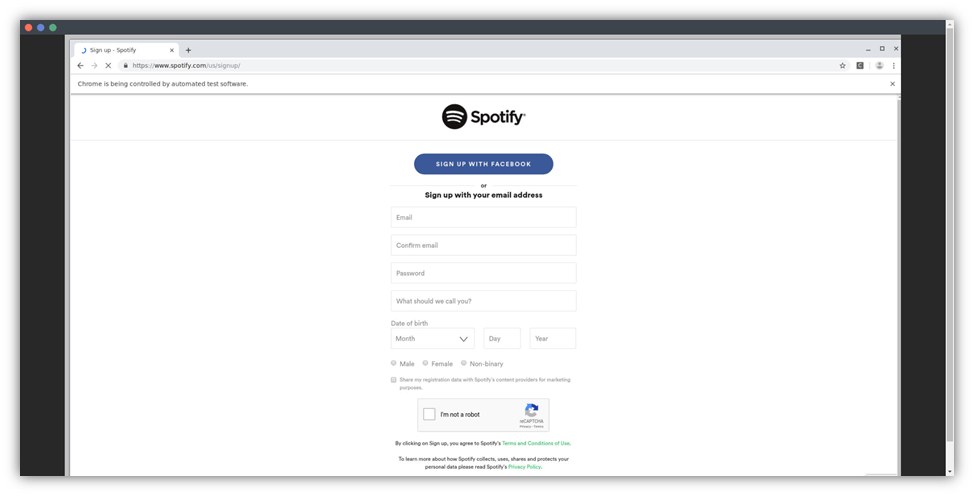
driver.get("https://www.spotify.com/us/signup/");
}
As we can see, in the @BeforeMethod annotation we describe what will have before each method.
@Test
public void typeInvalidYear() {
     page = new SignUpPage(driver);
     page.setMonth("December");
                 .typeDay("20")
                 .typeYear("85")
                 .setShare(true);
      Assert.assertTrue(page.isErrorVisible("Please enter a valid year."));
The @Test annotation provides code for test methods.
   @AfterMethod
    public void tearDown() {
        driver.quit();
    }
The @AfterMethod annotation contains the code that should be executed after each method.
When running tests using Selenium, the following will happen:
When running the next test the same things will happen. It should be mentioned that running tests on Selenium is rather a resource-consuming process.
So what is Selenide itself? What are its main features and advantages?
In short, Selenide is a wrapper around Selenium WebDriver that makes it quick and easy to use when writing tests. At its core, Selenide is a tool for automating user actions in a browser, focused on the convenience and ease of implementing business logic in autotests in the user’s language, without being distracted by the technical details of working with the “browser driver”. For example, we do not need to focus on working with the waiting for elements in the process of automating testing of dynamic web applications, as well as on the implementation of high-level actions on elements.
Key and main advantages of Selenide:
The purpose of Selenide is to focus on the business logic of tests and not “waste” mental energy on technical details.
To get started with the Selenide we need to add the Selenide dependency to the pom.xml file. Since we no longer need the Selenium dependency, we simply remove it.
<dependency>
             <groupId>com.codeborne</groupId>
             <artifactId>selenide</artifactId>
             <version>5.2.8</version>
</dependency>
In order to start using Selenide in our project, we also need to make some imports. Here are the examples of import required classes:
For more information on how to connect Selenide using the rest of the project builders, see the Quick start section of Selenide documentation.
Let’s move on to the Selenide elements and consider the assertions and waits available in Selenide.
import...

public class SignUpTest {

private SignUpPage page;

   @BeforeClass
   public static void setUp() {

	   baseurl = "https://www.spotify.com";

       browser = "chrome";

   }
We replace the BeforeMethod annotation with the BeforeClass annotation in the test file since we no longer need it. Selenide eliminates the need to write Before and After methods as Selenide takes care of the AfterMethod function. We only have the BeforeClass annotation left to register a pair of properties.
We registered the property baseurl, which is in the configuration class and in the BeforeClass annotation and it will be the base url. Therefore, the driver.get that we used in our Selenium tests is no longer needed. We set the browser on which we will run our tests in the property browser.
We can completely abandon the Selenium driver in our test project, Selenide will take care of all the work, encapsulating it in its classes. We will only have to focus on the logic of the tests themselves.
Let’s proceed to using Selenide on our page:
    public SignUpPage open() {

         Selenide.open (relativeOrAbsoluteUrl: "/us/signup/");
         return this;
    }

    public SignUpPage typeEmail(String email) {

         $(emailField).sendKeys(email);
         return this;

   }
When invoking the open method, Selenide itself starts a browser session and opens a web page. Selenide also makes sure the browser is closed at the end. Within Selenide.open we can write either the whole http url path, or we can write a relative url. Since we indicated an absolute path as a baseurl, within the Selenide.open method it’s enough to indicate just “/”.
public SignUpPage typeEmail(String email) {

    $(emailField.sendKeys(email);
    return this;
}


public SignUpPage typeConfirmEmailField(String email) {

    $(confirmEmailField).setValue(email);
    return this;
}
In order to find an element using Selenide, we should indicate $ instead of driver.findElement command used in Selenium. I.e using a one-character method we can find directly the element itself. The search method is accepted as a string, similar to the jQuery JavaScript library by default. This streamlined syntax enhances the readability and efficiency of writing Selenium tests with Selenide. Additionally, if no elements are found, Selenide returns a default value, eliminating the need for explicit null checks in the test code.
In order to find a list of elements using Selenide, we should indicate $$ characters. Instead of List <WebElement>, we write the ElementsCollection command that is already extended with additional methods.
To work with elements we can use both standard Selenium methods (sendKeys()) and setValue() method or its short version vаl().
As we can see, Selenide methods are more understandable. Method click() remains the same, though Selenide has several click() methods: contextClick() (right mouse button imitation) doubleClick() ( imitation of double click on element ) and so on. Having a certain element found, we can continue the search using other locators.
The difference between Selenide find() method and Selenium driver.findElement(By) is that Selenide find() can immediately receive CSS selectors and operate with the Selenide elements, not the Web elements. Basically, Selenide-elements are a more “smart” alternative to Selenium web elements.
Selenide already contains those methods, which would have to be done through an action class or some other way. Selenide allows writing brief and “nice” methods that are understandable for everybody. Selenide is also rather flexible, and due to that we can use standard Selenium features.
You can find more information about Selenide methods in the official documentation.
Let’s look into wider and more understandable verification examples provided by Selenide:
        page.getError("Please enter a valid year.").shouldBe(Condition.visible);

        page.getError("When were you born?").shouldNotBe(Condition.visible);

        page.getErrors().shouldHave(CollectionCondition.size(6));

        page.getErrorByNumber(3).shouldHave(Condition.text("Please enter your birth month."));
Selenide verification scheme allows us to take any element, find it and use the following assertions for it: should, shouldBe, shouldHave, shouldNot, shouldNotBe and shouldNotHave. Depending on the logic and our needs, we use certain “should-methods”. When we want to check if the element exists, we use should(exist). When we want to check if the element is visible, we use shouldBe(visible) method and so on. In fact, we use only three assertions: should, shouldBe, shouldHave, or opposite to them shouldNot, shouldNotBe, shouldNotHave.
Verifications of elements and element collections on Selenide are carried out with the help of methods (assertions) described above. They play role of explicit waits in Selenide: they wait for a condition for a certain element to be satisfied.
Formulations in Selenide are quite logical and understandable. We can write our methods either using the development environment hints or using our logical assumptions. And of course, we can always take a look at the code for implementing the necessary methods described in the documentation, or we can look through the implementing of the method itself.
For JUnit:
In order to take a screenshot automatically after each failed test, we can make an import and indicate the Rule.
import com.codeborne.selenide.junit.ScreenShooter;

@Rule
public ScreenShooter makeScreenshotOnFailure = ScreenShooter.failedTests();
But in fact, it’s a rudiment, since Selenide has been taking screenshots automatically when tests fail for quite a while. It’s very convenient for error analysis. Selenide saves all the screenshots to a build/reports/tests folder by default.
In order to take a screenshot automatically of each test (even succeeded), we use the following command:
@Rule
public ScreenShooter makeScreenshotOnFailure = ScreenShooter.failedTests().succeededTests();
For TestNG we also make an import:
import com.codeborne.selenide.testng.ScreenShooter;

@Listeners({ ScreenShooter.class})
In order to take screenshots automatically after succeeded test, we invoke the following command before running tests:
ScreenShooter.captureSuccessfulTests = true;
We can also make a screenshot with a single line of code at any moment:
import static com.codeborne.selenide.Selenide.screenshot;

screenshot("my_file_name");
Thus, Selenide will create two files: my_file_name.png and my_file_name.html
Let’s proceed to Docker itself and its advantages:
When discussing Docker, it’s essential to clarify a few key concepts:
Container is a running instance that encapsulates the necessary software, including the browser image, allowing for efficient and isolated execution of applications. Containers can be created, deleted, and recreated quickly within a short period of time.
Container image serves as the essential foundation for each container, encompassing all the requisite dependencies and configurations. This includes the incorporation of new images for browsers, ensuring the availability of the necessary components to execute the application within the container. By leveraging these container images, you can seamlessly set up and run your applications within isolated environments, guaranteeing consistency and reliability across different containers. The inclusion of new browser images further enhances the versatility and adaptability of the container, enabling you to tailor your testing environment to specific requirements and scenarios.
Docker Hub, the primary public Docker repository provided by Docker Inc., is a centralized source for a vast collection of container images. Within this repository, you’ll find a diverse range of “official” browser images developed by the Docker team or in collaboration with developers. These images are specifically designed to include essential components such as live browser screen, video recording capabilities, and other necessary functionalities. With these images, you can perform comprehensive testing and analysis, capturing recorded video files of the testing sessions for later review and evaluation. Docker Hub thus acts as a valuable resource for obtaining reliable and feature-rich container images that enhance your testing and analysis workflows.
By granting appropriate execution permission to your containers, you ensure that they can run and execute the desired applications effectively. This permission allows the containers to access and utilize the necessary resources, interact with the operating system, and perform the required actions for successful application execution.
To install Docker for Windows, we open the direct link https://hub.docker.com and download the Docker Desktop app for Windows or MacOS. Ensure that you have Docker installed on your system to proceed with the installation.
To install Docker for Ubuntu Linux, we need the sudo apt install docker.io command.
Then we need to run Docker and configure it to start automatically when the system boots by executing the following commands:
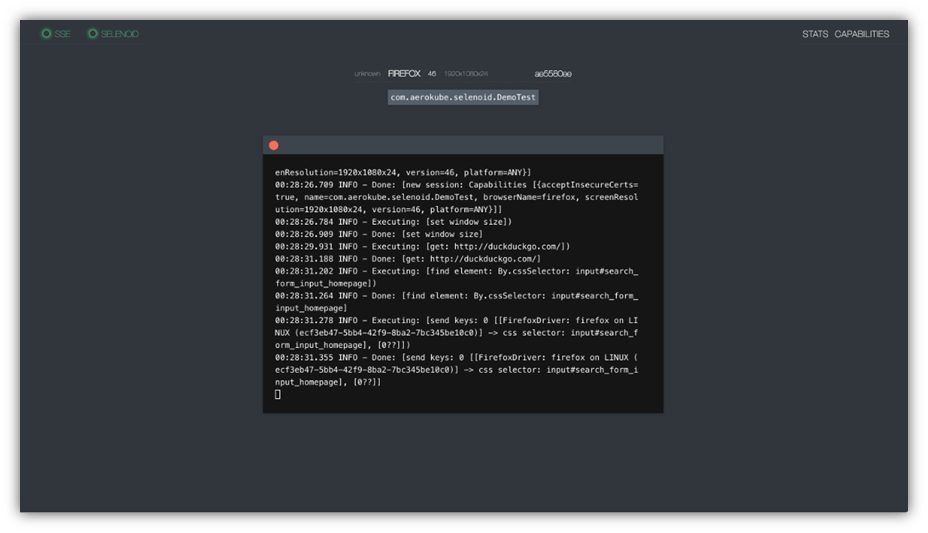
Selenoid is a powerful server that excels in launching isolated browsers within Docker containers, eliminating the need for a centralized Selenium hub. This capability empowers you to effortlessly manage and control the browser instances required for your test automation, ensuring seamless execution and eliminating any dependencies on a centralized hub. With Selenoid, you gain control and flexibility to launch browsers within Docker containers, simplifying your testing infrastructure.
Advantages of Selenoid usage:
Before installing Selenoid, there are a few prerequisites:
./cm.exe selenoid start –vnc
./cm.exe selenoid-ui start
The ./cm.exe selenoid start –vnc command will download the latest Selenoid version, browser container images, web driver binaries, generate configuration file and finally start Selenoid.
The ./cm.exe selenoid-ui start command installs and starts Selenoid UI. It is a user interface to track what’s happening during the test execution.
Selenoid runs on standard Selenium 4444 port by default. We can redefine the port using the –port key.
Aerocube Selenoid was developed to work in big clusters, that’s why it has no user interface. And that’s why the attempt to open tests Endpoint http://localhost:4444/wd/hub will return a 404 error.
However, with the VNC feature enabled, you can utilize remote desktop functionality to access and interact with the graphical interface of browsers that run Selenoid containers.
This allows for convenient visualization and debugging of tests.
Selenoid UI is available at the link: http://localhost:8080/
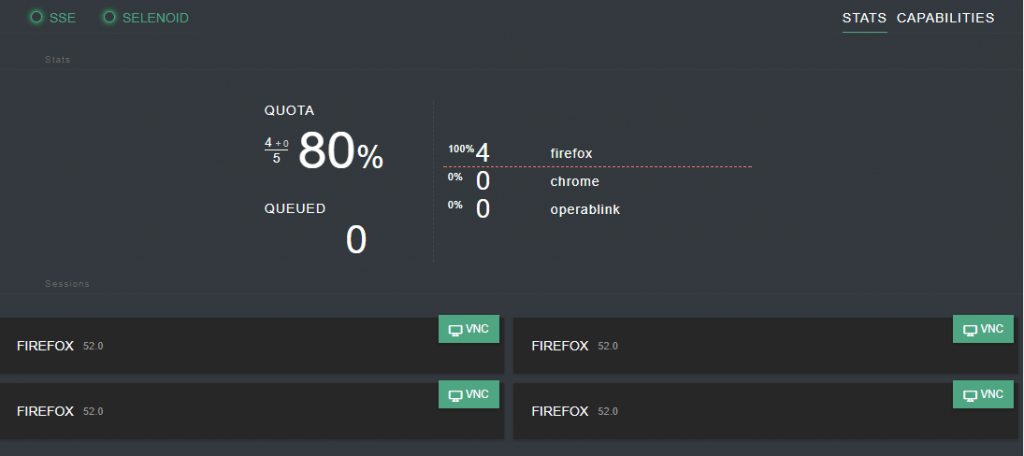
Here we can see the current quota usage, pending browsers and the queue itself. Selenoid UI gets updates via SSE, so there is no need to renew the browser to see what is going on. It will reconnect automatically after any temporary failure.
If we talk about simultaneous testing on different devices, e.g: we have a cross-platform web app with a real-life chat function, we can simultaneously test the interaction between them, that is obviously comfortable.
Selenoid UI has the following capabilities:
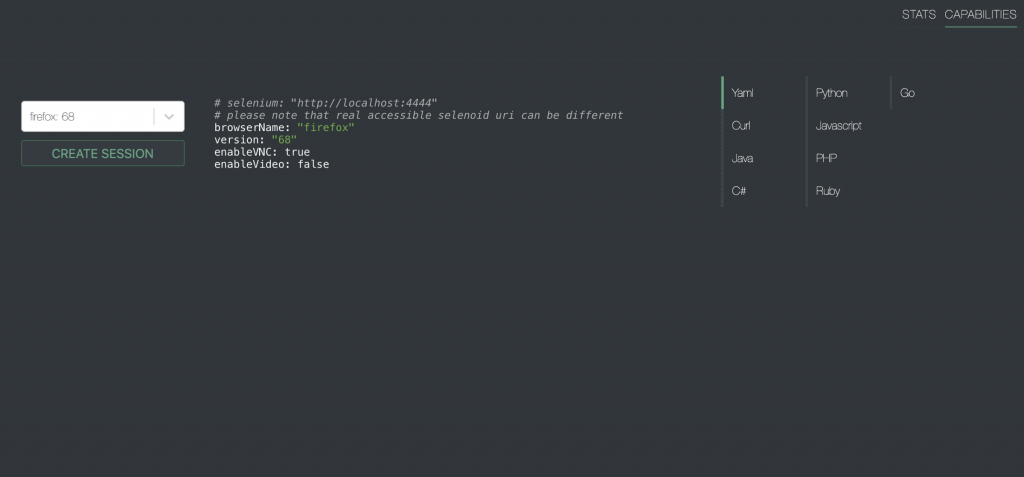
You can choose a browser from available browsers and UI will provide a setup example with the right capabilities. We can see from the screenshot that examples are available for several languages.
With the selection of the browser, it could be launched manually right in the interface. While executing tests, we can connect to vnc port in a real-time regime, get access to the browser and even intervene in the process of autotests execution.
If you use enableVNC=true capability, you can see a list of the available statistics. With VNC, you have the ability to see and interact with the browser directly, while the log will reflect all the actions performed within the browser. This feature provides a visual representation of the test execution process, allowing for real-time monitoring and interaction with the browser. By utilizing the VNC feature, you can gain valuable insights into the behavior and functionality of the browser.
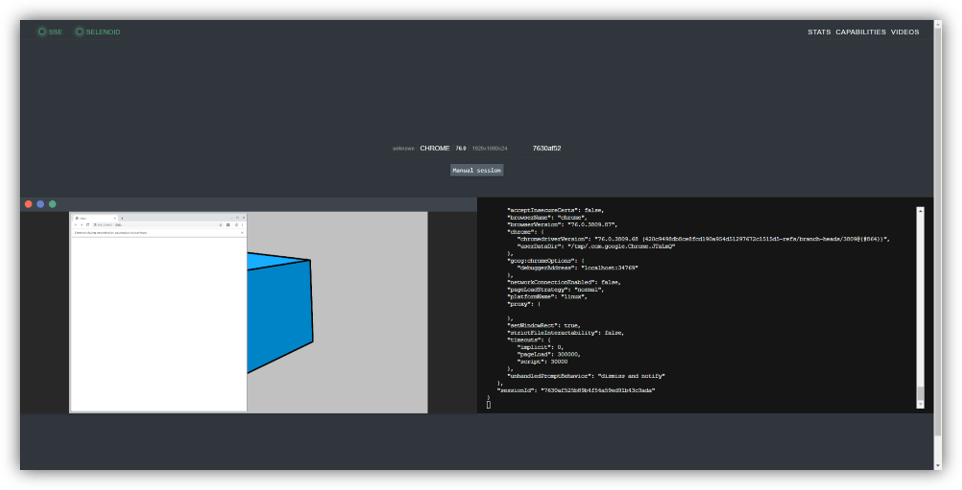
VNC session:
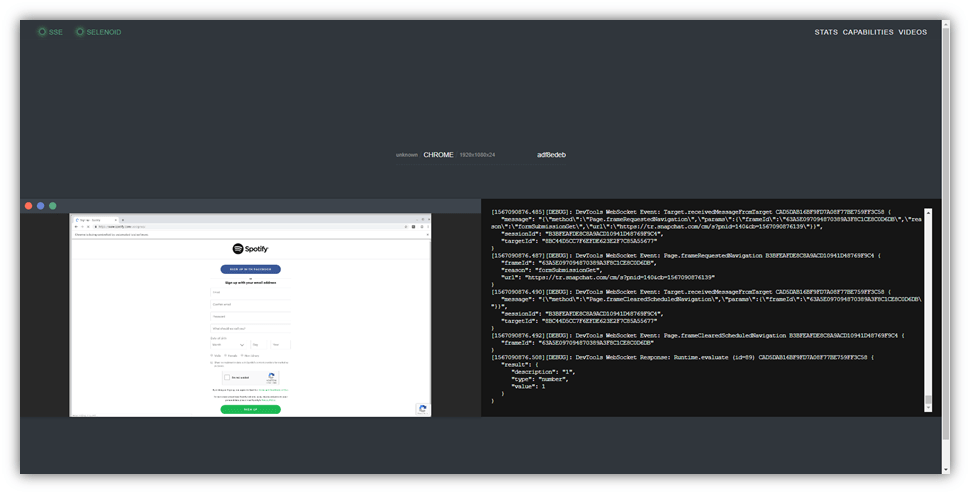
VNC fullscreen mode:
Even without utilizing the VNC (Virtual Network Computing) flag, Selenoid provides the ability to access the logs of the Docker container for each Selenium session. This standalone binary feature allows you to view comprehensive logs, offering valuable insights into the execution and behavior of the containerized environment during test execution. By enabling centralized log storage, you can efficiently analyze and monitor the logs, gaining valuable information and facilitating troubleshooting and debugging processes. With access to detailed logs and the ability to view the live browser screen, you can effectively investigate issues, improve test reliability, and enhance overall test quality. This comprehensive logging capability in Selenoid empowers you to identify and address any issues that may arise during test execution, ensuring smoother and more reliable testing processes.
In addition, it is worth noting that Selenoid is regularly updated to ensure compatibility with the recent version of Selenium. This ensures that you can leverage the latest features and enhancements available in the recent version of Selenoid, further optimizing your test automation efforts.
In addition to its powerful features, Aerokube Selenoid offers the capability to record videos of your test sessions. You can easily access these recorded videos by opening http://localhost:4444/video/ or by navigating to the “Videos” tab in the Selenoid user interface. This allows you to review and analyze the recorded test videos, gaining valuable insights into the behavior and interactions of your tests with the browser.
The video recorder image provided by Selenoid captures the entire test session, including the video screen size, providing a comprehensive visual representation of the test execution process. This feature is particularly useful for debugging purposes, allowing you to identify any issues or unexpected behavior during test execution.
In order to add Selenoid into the @BeforeClass annotation we need to do the following configuration:
Configuration.remote = "http://localhost:4444/wd/hub";
Configuration.browser = "chrome";
Configuration.browserSize = "1920x1080";
DesiredCapabilities capabilities = new DesiredCapabilities();
capabilities.setCapability(capabilityName: "enableVNC", value: true);
capabilities.setCapability(capabilityName: "enableVideo", value: true);
Configuration.browserCapabilities = capabilities;
Since now we have the Configuration.browser = “chrome” property, we delete Property baseurl which defined the browser for running our tests:
@BeforeClass
public static void setUp() {
       Configuration.remote = "http://10.0.75.1:4444/wd/hub";
       Configuration.browser = "chrome";
       Configuration.browserSize = "1920x1080";
       DesiredCapabilities capabilities = new DesiredCapabilities();
       capabilities.setCapability(capabilityName: "enableVNC", value: true);
       capabilities.setCapability(capabilityName: "enableVideo", value: true);
       Configuration.browserCapabilities = capabilities;

ChromeOptions is a versatile class provided by the Selenium WebDriver library that allows you to customize the behavior and configuration of the Chrome browser session during automated testing. With ChromeOptions, you gain granular control over various settings and preferences, enabling you to tailor the browser’s behavior to your specific testing requirements.
Using the new ChromeOptions, you can specify the following options:
By leveraging the capabilities of the new ChromeOptions, you can take customization and fine-tuning of the Chrome browser to the next level, enabling you to achieve precise and extensive test coverage. One notable capability of ChromeOptions is the ability to set a custom test name for your test cases, providing meaningful identification of each test.
Additionally, when combined with Selenoid, you can further enhance your test automation efforts. Selenoid allows you to specify the Selenoid host, which provides a powerful and scalable environment for executing your tests. With Selenoid, you can manage specific browser behaviors, such as screen resolution and limit memory usage, to ensure reliable and efficient test execution.
To further optimize your testing endeavors, make sure to grant execution permission to the necessary components and ensure proper resource allocation. This will enable smooth and uninterrupted test execution, enhancing the reliability and success of your testing processes.
With the power of ChromeOptions, Selenoid, custom test name, configurable browser behaviors, and efficient resource utilization, you can elevate your test automation to new heights.
Selenoid uses containers to run browsers, but there are cases when it’s not possible to run browser within a Docker container. Selenoid uses containers to run browsers, but there are cases like Internet Explorer on Windows when it’s not possible to run browser within a Docker container. In such cases, Selenoid can be utilized to launch browsers like IE, Firefox, or Chrome on Windows. You can use Selenoid to run IE for your testing needs.
Selenoid leverages containers to execute browsers, but there are certain scenarios where running a browser within a Docker container is not feasible. For example, Internet Explorer (IE) on Windows cannot be run inside a Docker container. In such cases, Selenoid provides a solution by allowing the launch of browsers like IE, Firefox, or Chrome on Windows. With Selenoid, you can utilize IE for your testing requirements, ensuring compatibility and flexibility in your test environment. This enables you to perform parallel testing across different browsers and platforms, optimizing your testing processes and ensuring comprehensive test coverage.
To do it we need:
{
        "internet explorer": {
          "default": "11",
          "versions": {
             "11": {
                "image": ["C:\\IEDriverServer.exe", "--log-level=DEBUG"]
              }
           }
        }
     }
With the flexibility of additional configuration options and endpoint customization, Selenoid provides a robust and customizable environment for executing browser tests. Take advantage of these features to optimize your test execution and streamline your testing processes.
Selenoid is a powerful solution based on Selenide + Selenoid in Docker containers, offering high flexibility for configuring the runtime environment, including testing software. This solution not only offers high flexibility for configuring your runtime environment, including testing software but also delivers efficiency. Experience the seamless integration of Selenide + Selenoid within Docker containers, empowering you to configure your environment effortlessly.
Embrace the game-changing combination of Selenide + Selenoid and witness the solid stability, significant time savings, and multitude of additional features that will optimize your processes. With this powerful implementation, you can ensure the delivery of top-notch software products in record time, exceeding expectations at every step.
By adopting the Selenide + Selenoid framework, you can supercharge your test automation tasks, leveraging the cutting-edge capabilities of these solutions. Seamlessly achieve accurate and efficient test automation, streamlining your QA workflow with ease and enabling the execution of custom tests tailored to your specific requirements.
By choosing the Selenide + Selenoid framework, you open the door to benefits. Experience the ease of configuration, the unwavering reliability, and the substantial time savings that come with this powerful implementation. Elevate your testing process to new heights and witness remarkable results that will revolutionize your software development lifecycle.


In this article, we will talk about the Android runtime environment. Notably, we promise to be brief and explain in short ART and Dalvik (DVM) differences in Android.

Legacy is 'inheritance', and this inheritance is hard to deal with. Almost every developer has come through the project where the received code was written by someone else ten years ago.

The conversation around blockchain and databases has been going on for a long time, but not everyone understands what it is and how to work with it. That's why we have decided to explain everything in simple words and sort the key concepts out.